How to make a choker from a ribbon with your own hands? DIY choker from old headphones - master class How to make a choker from a belt
Women wore chokers back in the 2nd century. BC. But this does not prevent the accessory from occupying a special place in fashion trends today, as can be seen in many photos in glossy magazines. It was worn around the neck by ancient Indian tribes to protect against evil spirits. Nowadays it is considered a stylish decoration.
Choker (from the English “choker” - noose, strangler) is a short decoration that fits tightly to the neck with a device for adjusting the size.
Accessories are different:
- numbering 1 or several rows;
- made from various materials (fabric, leather, metal, etc.);
- complemented with jewelry, rhinestones, fur.
There is no age limit for wearing it - if chosen correctly, it will look impressive on both a young girl and an adult woman. There are also no gender restrictions - many different models of chokers are made specifically for men. The accessory is used in men's collections by world designers.
The main principle of wearing is that the necklace should fit tightly around the neck without cutting into it. The decoration is plastic and flexible, so it does not cause discomfort when worn.
What are chokers worn with?
Thanks to the fact that it is made from different materials, a choker around the neck (the photo clearly demonstrates this) can be combined with different styles of clothing.
- Victorian, distinguished by precious stones and expensive materials, will perfectly complement the attribute. For a special or festive occasion, a richly decorated choker is suitable.
- A simple necklace that does not have massive details will complement your everyday design. For example, a neck belt will fit well into an outfit consisting of a T-shirt or a plaid shirt.
- An evening outfit in the form of a black classic dress will be complemented by sophisticated jewelry. This also includes long flowing dresses that go well with a choker necklace.
- Safari, ethnic style or hippie - leather, linen and suede short beads are most suitable.
It is important to remember that the choker is not worn with:

When choosing a buckle for your neck, you should avoid other jewelry. The exception is long chains made of gold or silver. The accessory is worn on a bare neck.
By correctly combining clothes with an attribute, you can make a simple neck belt a universal addition to your bow. On the contrary, the slightest mistake in the combination of things can result in a vulgar image.
One of the main conditions when wearing a headband is that the clothing has at least a small neckline. It is not advisable to complement it with heavy bracelets or an abundance of other jewelry.
Types of chokers for men and women
Choker around the neck, photos of which can be seen below, come in different types:
- Metal- a universal option, will fit into a daily and evening look. The only limitation is that only girls with a long neck can wear a metal choker necklace.
- Wide- resembles a golf collar. Decoration made from materials with light patterns looks better, which visually enlarges the neck and looks ideal with a dress or jacket with a neckline.
- From beads- looks neat and elegant. Variations can be different - made from small beads, in combination with large elements. Accessory additions with pendants are welcome. Wear them with dresses, tops, jeans.
- Lace- helps soften sharp lines and optically make the neck thinner. Airy white openwork will add tenderness.
- Velvet- fits any style. The material emphasizes the whiteness of the skin. You can complement the choker with a pendant or pendant.
- Leather- fans of all things natural will love this leather accessory. The stripe can be thin, wide and in different shades. Combines with rock, ethno-style and gothic.
Men's chokers generally have a minimum of additional elements, are plain, without voluminous inserts.
How to make a choker with your own hands?
To make a choker with your own hands you will need the following tools:

Additional materials:
- fishing line;
- small rubber bands;
- headphones;
- satin ribbon;
- threads;
- beads;
- lace;
- chains;
- metal.
Suitable for decorating the product:
- bugles;
- fur pieces;
- artificial flowers;
- pendants.
The neck belt generally has a length of 35-41 cm, and is attached with a carabiner, which allows you to set the length taking into account the diameter of the neck. If you make jewelry at home using a clip, it should be 1 cm shorter than the neck circumference. This is necessary to attach the clasp and rings.
To measure correctly, you need to tightly grasp the diameter of the neck with a sewing centimeter. If the measurement was carried out using tape, then by attaching it to a tape measure you can find out the size. When worn comfortably, the finished choker should not dig into the neck. 
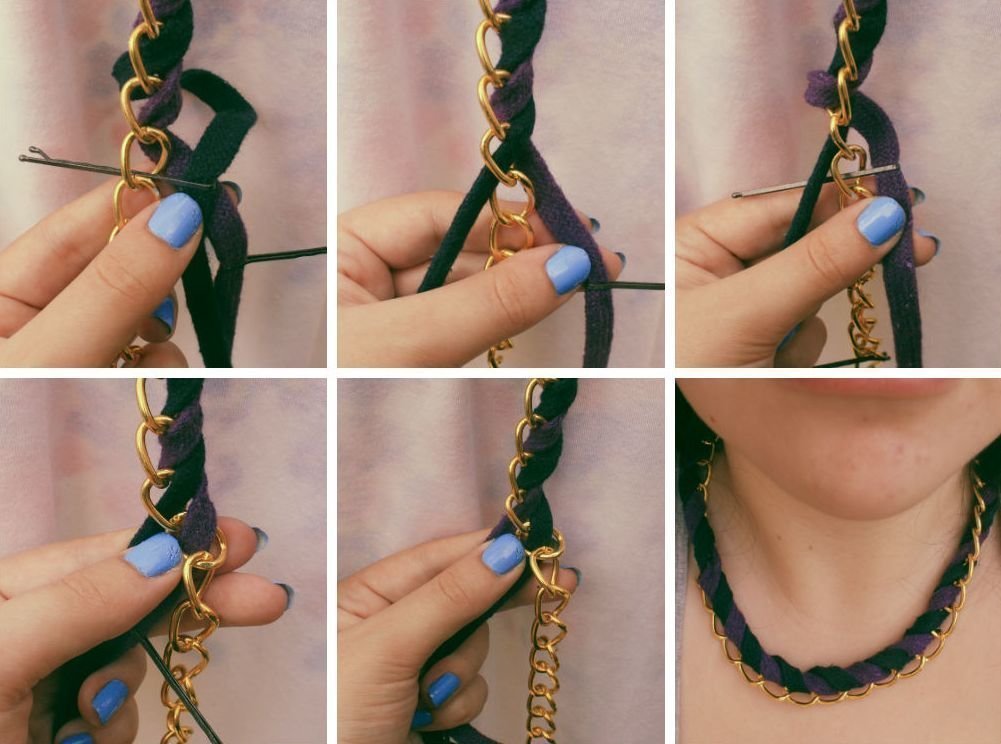
Regardless of the material used (fishing line, cord or spandex), the technology for creating the simplest decoration is the same:
- Fold a piece of thread in half.
- Secure the fold to the book cover with a clamp.
- Place the right part under the left, and return the right end of the cord under the thread of the same side.
- Slide the created loop, tightening, towards the clamp.
- Perform similar actions with the left side. The loop will be on the other side.
- Continue alternate weaving. If desired, add beads or a pendant.
- Try it on, and after making sure that the product fits snugly to the neck, you need to thread the free edges into the starting loop.
- Tie the edges in knots and cut off the excess.
- Solder with a fire-producing device.
Velvet choker
Choker around the neck (a photo of the manufacturing process can be seen below) made of velvet:

To make an accessory with decor on the front, you need to cut a ribbon that will tightly fit around the circumference of the neck. Then hang the pendant and attach the clasps, which are attached one after the other.
Satin chokers
A satin ribbon choker is made in stages:
- Measure the volume of the neck and add 1.5-2 cm from each edge for allowances. If you intend to tie a ribbon, you should add at least 10 cm.
- Cut to selected length.
- Find the center of the strip using a centimeter, or folding it in half.
- Make a hole in the middle for the ring.
- Attach the desired pendant and press the ring with pliers.
- Using nail scissors or a seam ripper, poke a small hole for a loop at one end of the satin ribbon.
- Overcast the loop with suitable thread to prevent the fabric from unraveling.
- Sew a button on the other side of the product.
- Carefully burn the edges of the ribbon with a lit match to prevent fraying of the threads.
Lace chokers
The lace neck choker, which can be seen in the photo below, looks feminine and elegant. 
Step-by-step technique:

Original choker decorated with a flower:
- Measure the diameter of the neck so that the accessory fits snugly.
- Make 2 blanks for the flower from felt. Cut out 6 oblong petals and 2 rounded centers. Lay the parts so that the lower level protrudes slightly along the length, pin the parts together.
- Grab a petal from the top and bottom layers. Secure them along the fold with stitches and pull the thread a little until a fold is formed. Without cutting the thread, repeat with all other parts of the workpiece.
- Compactly collect all the petals into a flower and sew one of the circles on top, acting as the core. The middle can be decorated with sparkles, rhinestones, and beads.
- Weave a scarlet ribbon to the black piece of lace, sew on a black ribbon 1 cm wide to secure the ribbon. Decorate the width of the cut with black tape.
- Divide the choker into 3 parts, and at the first division point, sew the second cut out circle to the wrong side. Sew a flower made to it on the outside.
Suede chokers
Making jewelry from suede is not difficult:
- To work, you will need 2 pieces of suede cord, 15 cm each, a pendant that is empty in the middle, 2 small clips for the braid, 2 connecting circles and 1 carabiner clasp.
- Fold one of the suede pieces in half and place the entire top in the middle of the pendant. Pull the 2 free edges of the cord through the resulting loop.
- Perform the same actions on the other side of the key fob.
- Secure the unoccupied ends of the rope with clamps. Pull rings on both sides of them and attach a carabiner to one of them.
Leather chokers
Necessary materials for making a leather neck belt:

Detailed diagram:
- Make markings on the wrong side of the material, cut 2 strips of 1.5 cm each. Their length should be 2 cm shorter than the volume of the neck. The lock will fill this difference.
- Fold one of the leather parts in half and bend it in the middle.
- From the center in both directions, mark the points for attaching the rivets, retreating 1 cm between them.
- Attach rivets.

- Sew 2 pieces of leather to one another, sewing in beads at the same time.
- Thread the cord between the leather elements to provide volume and maintain shape.
- Sewing with beads in the middle, insert a large bead to which the pendant will be attached.

- Attach the lock by clamping the edges with pliers, after placing a piece of fabric.
- Attach a pendant to a large bead.
Chokers with pendants
Making an accessory from fabric with a pendant step by step:
- If you make a pendant yourself, you need to take a setting with a loop, and use glue to attach chipped stones, multi-colored or of the same shade. Leave to dry for 12 hours.
- You can use thin leather as a base. Cut out a piece 1-2 cm wide and 25 cm long.
- Coat the wrong side of the material with glue and tuck the edges towards the center.
- Cut the resulting strip into 2 equal parts and use round pliers to secure the clamps on each side.
- String a stone on them and form a spiral.
- Then release the last link on the extension cord and attach the stone to it.
- Attach a ring to the clamp of one half of the fabric strip, and then an extension. On the other strip, attach a locking carabiner to the clip.
- Put on the pendant. Place a ring on the unoccupied terminal and attach a pendant. Perform the same actions with the remaining free tuck.
Accessory from old headphones
A neck choker made from headphones, which is shown in the photo below, can be easily woven yourself, but this will require a little time and imagination. 
Manufacturing technique:

Choker made of beads
Necessary materials:

The original decoration is made in the following way:
- Attach a piece of fishing line to the table with tape so that the product does not slip while working.
- Apply a drop of glue to it at a distance of 3-4 cm from the edge of the thread. While the drop has not dried, put a bead on the other edge of the fishing line, i.e. so that it fits onto the glue and attaches well to the base.
- In a similar way, string and fix all the other beads along the entire length of the cord, while placing them at a distance that corresponds to the measurement taken.
- When the required size of thread is filled with beads, cut off the excess fishing line. Place a drop from a glue gun at the very edge, and, without waiting for it to harden, place a special clamp on the glue. Repeat the procedure at the other end of the product.
- Pull the connecting ring onto the clamp on one side, and the carabiner on the other.
Metal choker
Required materials:

Method of making an exclusive metal necklace with your own hands:
- Measure the volume of the neck, subtract 2-3 cm and cut off the resulting length.
- Bend the future necklace in the form of a circle (using a plate, roller, or go around the neck).
- Carefully straighten if there are any unevenness or curvature.
- Glue the selected decorative element exactly in the center.
Unusual chokers
A choker around the neck (photos of each type can be seen later in the article) can be made original. To do this you need to show imagination. Some interesting ideas are described below.
Tatting is an elegant accessory. To complete it you will need:
- beads;
- thin wire;
- threads;
- rings - 13 pcs.;
- large needle;
- locks;
- hook.
Production in stages:
- The basis of the necklace is rings. Take one and braid it using a hook and thread.
- After wrapping, make a small chain and design the next ring.
- How many rows there will be and the length of the neckband can be chosen as desired.
- As you work, you can add beads or seed beads.
- After completing the weaving, attach a clasp to the ends.
A braided choker is an elegant attribute. It is crocheted from thin threads interspersed with:
- stones;
- rhinestones;
- beads;
- chains.
The products have different lengths - if they are made from a chain, then the accessory falls below the collarbones.
Neck chokers made of warm yarn are warm enough, so in winter they can replace a scarf. To create them you will need knitting or crocheting skills. You can make beautiful lace products that will go well with woolen dresses. 
From openwork braid, lace and flounces you can create an accessory in the form of a stand-up collar. 
For brave girls, rock or punk style jewelry with spikes, pins and similar decor is suitable.
How to make a choker tattoo from beads?
To create an accessory you will need:

Execution in stages:
- Weaving is carried out from 2 bead threads. For them, cut 2 pieces of 1 m each. At the end of one of them, tie 5-6 knots in one place. The thickness of the node should be several millimeters.
- Place beads on the long edge of the thread.
- String 82 cm of glass beads. Leave 2 cm from the edge of the cord free. Tie the same knot as at the beginning of twisting.
- Assemble another similar piece of fishing line with beads.
- Fold the 2 edges of the segments together. Cut off the ends of the twine. Use a lighter to burn off excess.
- Place the knots you have made into the fixative. Press with pliers.
- Place the first ring on the clamp.
- Using a binder, secure the threads with the glass beads to the edge of the notebook. Attach the clamp at the very beginning of the fishing line.
- Start weaving the decoration. Its pattern will accommodate knots with different directions. Start tying from the right side around the left.
- Knit the second one in reverse.
- You need to knit alternating knots. Immediately tighten the loops to the required size.
- Weave knots along the entire length of the beaded fishing line. Make sure that the threads do not twist.
- At the end of the work, cut off the tails of the twine, melt them, put them in ribbon clips and press them with wire cutters. Using another ring, attach a carabiner to the loop.
- Straighten the product and make identical loops on both edges of the necklace.
Stylish looks with chokers
A fashionable and original look will be created by the following choker options:
- Black accessory decorated with pearls.
- There is a metal strip in the middle, leather cords on the sides.
- Instead of a necklace, a narrow scarf.
- Gold or silver necklace in the form of a chain.
- Handmade decoration with various stones.
- From glazed balls.
- A pearl necklace is a universal type of choker, suitable for different occasions. The right accessory can even be combined with a business style.
For men these are the following variations:

Choker selection according to face shape
A choker is an adornment only when it goes well with your clothes and figure. Women who have a short, full neck should avoid this attribute. For representatives of the fairer sex with a long neck, you can wear any variety of it. The wider the necklace, the more attractive it will look.
To visually lengthen your neck, you need to wear a headband in a neutral shade (beige, black, gray), wear a blouse or dress with a large V-shaped neckline. An open accessory made of metal is also suitable (the girth of the choker should be 3-5 cm less than the diameter of the neck), which will visually add a few centimeters to the length of the neck.
A necklace will highlight facial features:
- Chokers add even more definition to a round face shape.
- With an oval shape, jewelry of different thicknesses and styles is worn, but not monochromatic.
- Accessories look good on people with a heart-shaped oval face - they round out the shape and soften a narrow chin.
Interesting ideas for creating an original choker
Suggestions for decorating an original necklace:
- from wire of various thicknesses;
- from ceramic beads or stones;
- acrylic;
- from shells;
- magnetic lock collar;
- denim belt;
- from the charger;
- from floss threads;
- cross-stitched or beaded strip;
- using rubber bands for weaving.
The technology for weaving an accessory from rubber bands is quite simple:

Double decorations look original, provided that they do not cover each other. For example, a combination of a narrow black ribbon and a short leather cord with a medallion, or a thin strip of lace with a gold pendant pendant.
Men's chokers can be made from the following materials:
- beads;
- twine;
- various cords;
- rubber, resistant to water;
- natural stones;
- wooden;
- wire.
Both women and men can choose a choker for their neck from a photo. The decoration will add brightness to the image and focus on the neck. By following the tips for choosing it, you can emphasize your own sense of style.
Video about chokers
Tattoo chokers on the neck:
5 cool DIY chokers:


A little history
The choker first appeared in Europe in the Victorian era. However, it came into particular favor during the time of the English Queen Alexandra, who tried to hide a small scar on her neck with a necklace of pearls and dark velvet. Such decoration, emphasizing the whiteness of delicate female skin, undoubtedly appealed to the fashionistas of that time. So, with the light hand of Alexandra, chokers are now firmly established not only in Europe, but also in the USA.


In the 20th century, Coco Chanel gave this decoration a second wind. Chokers from her collection were made not only of velvet, but also of leather or silk ribbons and trimmed with a planchet (insert) made of precious metals.
Today, choker necklaces have firmly settled not only on the catwalks, but also in the wardrobes of many modern women. For example, Princess Diana preferred pearl chokers with inserts of large precious stones. The images of Matilda from Luc Besson's film "Leon" or Angelina Jolie from "The Tourist" cannot be imagined without a black ribbon choker that fits tightly to the neck.
Advice! You can wear this necklace with almost any outfit. Thus, couturier John Galliano considers chokers to be a universal decoration that goes well with both jeans and evening wear.
Types of chokers
All chokers can be divided into main groups:
- men's: have a minimum of details and decorations;
- tattoo chokers: made by weaving from elastic threads or fishing lines of any color, stretchable, ideally adjacent to the skin and outwardly indistinguishable from the pattern on the skin; can be supplemented with small decorations: beads, rhinestones, etc.;


- chokers on a cord, ribbon or chain with or without a pendant;
- jewelry woven from wire: unlike tattoo chokers, they are made more voluminous and have a larger number of decorations (beads, beads, stones, chains or rhinestones);
- chokers made of beads or beads;
- leather trimmed with buckles or metal decorations;
- made in the form of a small metal rim made of wire or precious metal;
- made in the form of a wide collar of velvet, lace, wool or metal strips;
- products knitted from yarn: soft and cozy, they are not only decoration, but also serve as protection from the cold.


Advice! The choker should be the main highlight of the look. You should not complement it with too many other decorations.
Materials used
Today, chokers don't have to be jewelry. For their manufacture and decoration, wood, leather, metal, bone, stone, plastic, beads, beads, rhinestones, pieces of fur, floss threads, lace, fabric, including velvet, etc. are used.


The technology of weaving chokers is simple, so even an exquisite, elegant decoration can be made by yourself. They can be made in one or several tiers of any width - be thin and miniature or have the appearance of a fairly wide strip encircling the neck. Decorations can be strung on wire, fishing line, spandex (elastic polyurethane thread), or elastic bands.
Advice! A choker that is too wide will visually shorten your neck. To prevent this from happening, be sure to choose a blouse or dress with a sufficiently long neckline for this decoration.
Tattoo choker
Made from an elastic material (thread or spandex line), the necklace that fits tightly to the skin really resembles a tattoo applied to the skin. That is why this decoration received its name.
To create such a choker we will need:
- fishing line or elastic thread for weaving 2.5 m long;
- beads for decoration (optional);
- lighter.


To begin, the fishing line or thread should be bent in half and secured to a board or book using a paper clip. Then we begin to knit the necklace, making regular knots alternately with the left and right threads. If desired, beads are periodically strung on the thread in the right places.
When the length of the choker is sufficient and equal to 35–40 cm, the excess threads are cut off. To make a simple clip-clasp on one side of the jewelry, they are fused together into a ring using a lighter.

Advice! From the same material you can make a whole set consisting of a choker, a bracelet and a pair of elegant rings.
Accessory from old headphones
To make a tattoo choker, you can also use a long 1 mm thick wire from a charger or headphones. To get a quality necklace, don't just use headphones that are too worn and scratched. A choker made of flat wires will also look unattractive - it is better to use round ones to make it.


The most difficult step is making the fastener:
- the simplest option for her is to leave the ends of the threads to tie them in a bow or knot, however, this method is suitable only for those with long hair; if you have a short haircut, protruding wires will be obvious;
- You can also make a fastener by twisting the wires; to do this, they are stripped of the winding and tightly intertwined with each other so that there are no small ends left that can catch on clothing;
- You can do it from a microphone; To do this, the ends of the wires are tied into knots, which are inserted into the microphone and snapped into place.
If desired, this decoration can be painted with colored or metallic spray paint. You shouldn’t do this before you start weaving - it may wear off during the process.


Advice! An interesting version of the necklace can be made from two wires of different colors, for example, black and pink or white.
Metal choker
This original decoration goes perfectly with denim or leather clothing. To make it, you can use fairly strong decorative wire that can hold its shape, metal plates for finishing with holes made in them, or wire rings, rivets, beads, etc.


Jewelry in the form of a plate, open necklaces of irregular shape with stones or balls at the end, or twisted metal jewelry look very extravagant.
Advice!Massive metal products can visually shorten the neck. Overweight women with small necks should avoid them.
Ribbon collar
For this type of decoration you need to take:
- satin or velvet ribbon, its length should be selected with allowance for hems;
- ring for attaching jewelry;
- pendant or coins with a hole made in them;
- clasp (carabiner) for jewelry;
- glue;
- scissors.


A pendant or coins are threaded into a small ring, which is secured to a ribbon. To fix the decoration, you can gently press it with pliers or secure it with a drop of glue. At the last stage of work, the ends of the tape are bent, a fastener is inserted into them, and then the tape is sewn up.
Advice! You can also secure this choker around your neck with a small bow. To do this, the tape must be purchased with a small margin.
Choker made of velvet or fabric
Women have long noticed that a dark velvet bandage can favorably emphasize the whiteness and tenderness of the skin. To make this aristocratic decoration you will need:
- a strip of velvet of the required width, about 50 cm long;
- pendant, medallion, brooch or other jewelry for use as a pendant;
- iron;
- sewing machine;
- threads;
- scissors;
- clasp.


The principle of making such a velvet cloth is similar to the previous one. The only difference is that in order for the fabric not to fray and lie fairly flat, it must be sewn in half. To do this, cut out a strip of the required size, bend it in half with the wrong side out, iron it, stitch it, and then turn it inside out so that the seam is inside the choker. A clasp is attached to the ends of the decoration.
Advice!Velvet goes perfectly with lace. You can decorate such a necklace with a flower made of felt or finishing braid and thin chains to match.
A stylish tattoo decoration can also be made from beads. For beginners, it is better to choose the simplest weaving pattern.

You can make such a choker from both large and small beads:
- before starting work, the fishing line is attached to the eye of the lock;
- two needles are threaded through each side of the thread;
- beads are placed on the fishing line using a needle according to the chosen pattern;
- each bead is knotted with the help of a second thread, which is also first passed through the hole; in this way the beads are supported on both sides by two knots;
- after completing the work, the thread is tied in the eye of the carabiner lock;
- if necessary, the second row of the choker is knitted; after inserting the last bead, the thread is again secured in the carabiner.
Advice!You can decorate such a choker with pendants. Threads of beads can also be wrapped into strands, thus forming a more complex necklace.

 We will need a piece of unnecessary Choker-tatting jeans
 This technique is based on weaving lace fabrics using knots. The main elements of the pattern are rings and arcs. The technique is somewhat similar to the crocheting method. The only difference is in the way the threads are threaded through the knots.
The simplest method is to tie ready-made rings or arcs made of plastic or metal using two knots - direct and reverse. Those who are more familiar with the tatting technique can use more complex weaving methods.
The necklace can be complemented with earrings woven using the tatting technique and elegant openwork rings made to match the main item. You can decorate them with fringe with beads.
Advice!When choosing a choker, you should carefully consider the entire look. An elegant necklace in combination with heavy, massive bracelets looks absolutely ridiculous. Wide chokers don’t look the best next to elegant, weightless brooches and earrings.
What to wear with?
There are only two restrictions when wearing this jewelry:
This necklace is designed to emphasize the beauty and shape of the neck, so when wearing it, it must be open; a V-shaped neckline in this case will be the most successful
- This necklace is designed to emphasize the beauty and shape of the neck, so when wearing it, it must be open; a V-shaped neckline in this case will be the most successful; the deeper the cutout, the more weightless and elegant the decoration will seem;
- With casual clothes - T-shirt, checkered shirt - a simple decoration that is not burdened with too many details will be ideally combined. For lovers of suede or leather clothes, as well as products made from coarse linen, you can choose chokers made of chains, stones or shells as decoration. An elegant choker made of lace or satin, as well as a product with an abundance of chains and studs in the “punk” or “rock” style, will go well with jeans and the same blouse. A little black dress or a long floor-length evening dress will be complemented by a short gold or silver necklace or a velvet choker with a precious pendant.


Advice! The choker should be the only decoration on the neck. The only exception is long metal chains, which go well with such a shortened necklace.
Tattoo choker- This is an unusual type of decoration, as it creates the appearance of a tattoo on the human body. The material that is used to create a choker is ordinary fishing line or elastic thread, which can be bought in the store at a very low price. Creating such a decoration with your own hands will not take you much time and effort, so let’s learn how to make a choker together.
What can a choker be made from?
Many people wonder what a choker should be made of, and we have the answer to this question. The main task is to choose the right material for the choker. This can be a fishing line, or a special elastic-stretchy spandex fishing line. Of course, spandex will be easier to work with and will look better, but if you have a lot of fishing line lying around at home, then why waste money? It is advisable that the fishing line be black, so it will look more attractive.
How to make a choker around your neck?
To create a choker we will need:
Lighter
Beads (optional)
These materials are not difficult to find on store shelves, and they will cost just a few pennies. Having prepared everything, we can begin.
1. We cut the fishing line 2.5 meters long. We bend it in half. To make it more convenient to make a choker, it is better to attach the clip to some book or board.

2. We insert the bend of the fishing line under the clamp, thereby fixing it. Next, take the left part of the fishing line and lay it on top of the right one.

3. Now, we push the end of the right part of the fishing line back under the right part (as shown in the photo).

This is the kind of loop we should get:

4. Now we pull this loop to the very top.

5. The next step is to take the left side of the fishing line and lay it down on the right side.

6. And again we make a loop, inserting the left end of the fishing line under the left part.

7. Pull the loop up again.

8. We continue weaving, thus first making a loop with the right part of the fishing line, then with the left.

9 . At the request of the creator, you can decorate the choker with beads, stringing them on a fishing line from time to time.

10. We braid the choker to the length we need, then cut off the excess edges.
Choker is a fashionable and stylish accessory that has not lost its position for several seasons. Many girls prefer to wear this type of jewelry, considering it an excellent addition to their style. But store-bought chokers are pretty standard. And I really want to stand out from the crowd!
The solution is obvious: make it yourself. So you decide for yourself in what color scheme to create it, from what materials and in what technique. Read on and you will learn how to make a choker with your own hands. This article includes several master classes on making this jewelry from various materials.
This elegant and original item is made using a 7-strand braid. The length of the product will allow you to use it as a bracelet in two circles or as a hair tie.
Materials:
- suede cord measuring 3 x 1.4 mm;
- fixing holder strips 20 mm – 2 pieces;
- clasp;
- 1.5 mm cord clips;
- round rings 5 mm;
- universal glue;
- pliers;
- scissors.

Step 1
Cut 7 strips of suede cord 50 cm long. Place them end to end. Use glue to secure them together. Wait for the glue to dry.
Insert the connected pieces of cord to the end into half the circumference of the fixing clamp bar. Press it with pliers carefully so as not to leave marks on the metal. You can also protect the metal with a piece of cloth or paper before pressing it with the tool.
Step 2
To start weaving, take the 3rd cord from the left and thread it over the 4th and under the 5th sections. Bring it to the middle of the clamp bar. Then take the 6th cord and pass it to the left under the 3rd, over the 5th and under the 4th sections. Push the weave up and straighten it out.
Below is a diagram of the beginning of weaving a product from 7 wires. Pass the wire on the left above the 2nd, under the 3rd and above the 4th segments on the right. Push the weave upward. 
Take the cord on the right and pass it under the 6th, over the 5th and under the 4th segments to the left. Adjust the weave. Repeat the work with the cord on the left and then on the right side, performing the same steps. 
Leave aside the outer sections at each end.
Start braiding with 5 strands. Pass the cord under the 1st and over the 2nd pieces on the right. 
Next, take the cord on the left and thread it under the 1st and over the second pieces on the left. Repeat the same with the cord on the left and right a second time. 
Then go back to grab the two threads you left around the edges.
Start weaving again with 7 strands. Repeat twice, then weave again with five threads.
Repeat in the same sequence 11 times until you get a braid 30 cm long.
Step 3
Cut off the remaining threads. Place a little glue on the ends and secure them together as you did in the beginning.
Using pliers, attach a second clamp bar to the ends of the weaving. 
Cut a piece of suede cord 30 cm long. Place one end of the piece in a 1.5 mm clamp. Connect the clamp to the 20 mm strip using a connecting ring. Form a knot at the end of the cord.
Repeat the same steps on the other side of the product. 
This technique can be used to create other jewelry such as bracelets, belts or headbands. 
To make a bracelet, use 7 pieces, each 25 cm long. To close it, use a locking carabiner clasp. For the headband, use elastic bands instead of metal clips. Well, to make a belt, just make the weave longer.
How to make a simple choker
This is an incredibly easy craft! To make it you will need no more than 7-10 minutes. At the same time, she looks so stylish! Feel free to play with different materials and colors to get a piece you really like!
What you will need:
- flat gold wire;
- leather cord;
- pliers for jewelry (round nose pliers);
- wire cutters;
- 2 beautiful pendants.

Step 1
Measure 90 cm of leather cord, cut and set aside.
Step 2
Using wire cutters, cut two pieces of wire 2.5-4 cm long (depending on your needs). 
Step 3
Thread a pendant onto both ends of the cord. Fold the skin up.
Using jewelry pliers, bend one end of the gold wire into a semicircle. This is necessary in order to secure the element to the craft. 
Next, use pliers to wind the remaining wire around the craft and squeeze it tightly. 
Use wire cutters to cut off the excess. 
To put on the necklace, simply fold it in half. Circle around the neck and insert the ends into the resulting loop. You can also wrap it around your neck several times and leave the ends hanging freely. No fasteners needed! 
How to make a choker from lace ribbon
This simple necklace combines 2 things: daisies and lace. It is made from black crocheted lace ribbon, but any kind of lace will work great. You can also get creative and include some beads, coins, pearl pendants, etc. 
Whatever material you choose, you will need 35 cm. This is the standard length for a choker. Black, white and gold are the most versatile colors, but bright shades also look great.
What you will need:
- floral lace – 35 cm;
- chain – 7.5 cm;
- tape clips – 2 pieces;
- connecting rings – 2 pieces;
- carabiner – 1 pc.;
- 1 small pendant (optional);
- jewelry glue or clear nail polish;
- thin pliers.

Step 1
Cut the floral lace so that there are full flowers on both ends. The tapered edge of the flower is perfect for securing in a clip.
Place a bead of jewelry glue or clear nail polish on the end of the lace. Using thin pliers, secure the clip to the ribbon. Make sure the lace is held firmly in the clamp. 
Repeat on the other side.
Step 2
Insert the carabiner lock into the ring on the clip on one side. 
Insert the chain into the ring on the clip on the other side. 
Attach a small pendant to the end of the chain. This will allow your chain to hang neatly and not catch on your hair. In addition, the decoration will look more interesting from the back.
See how simple it is! You can also make this necklace with a longer ribbon that you can tie around your neck in a bow. Sometimes the simplest solutions are the most elegant!
How to make a choker from beads with your own hands
This cute beaded ornament is great for summer! To create it you will need large beads of three shades and beading fishing line. 
Time:
30-60 minutes
Difficulty: 3/5
What do you need:
- strong fishing line/monofilament;
- large beads in white, yellow and blue;
- carabiner lock;
- connecting rings;
- bead needles.

To make this item, repeat the below technique as many times as necessary. To separate the flowers, you can use one bead, several, or none. For this necklace, the optimal division is 1 bead.
Step 1
Cut a piece of fishing line at least 2 times longer than the expected length of the product. At one end of the fishing line, securely secure the connecting ring. Attach a carabiner clasp to this ring.
Step 2
Take four white beads and one yellow one. Thread them on the thread in this order.
Pass the line back through the first bead. Tighten. You have formed half a flower.
Add three white beads to the fishing line. Pass the needle through the white bead that is closest to the yellow bead. Tighten. You have made one flower. 
Step 3
Add one blue bead to the needle. It is needed in order to separate the flowers from each other. If you don't want any divisions, you can skip this step.
Repeat steps 1-3 until you get the necklace to the desired length.
Step 4
Once you've finished braiding, tie a connecting ring to the fishing line. Thread the second part of the lock onto this ring. Ready! 
How to make a choker with ties
Hinges are an original addition to accessories. Large or small, they are versatile and can be used in a variety of projects. 
It will only take you 15 minutes to make this craft. Only initially you should get hole-punching pliers and eyelets.
You will need:
- leather cord – 0.5 m;
- a piece of natural or artificial leather;
- small eyelets;
- hole punching pliers;
- scissors/awl;
- flexible measuring tape;
- pen/marker.

Step 1
To get the correct necklace size, measure the circumference of your neck. Subtract 5 cm from this value. This will be the length. 
The width of the product depends only on you. We suggest that the optimal width should be no more than 2.5-4 cm. This is a dense fabric and can be quite uncomfortable if it is too wide. 
With the resulting measurements, mark a rectangle on artificial or natural leather. Cut it out. 

Step 2
Apply 1 or 2 eyelet rings evenly to the short edge of the leather fabric. Mark a dot in the middle of each piece with a marker or pen. 
Use an awl to poke holes in the marked locations. Carefully insert the eyelet blocks into the holes. 
Using hole punching pliers, squeeze the pieces tightly and secure them in place. 

Repeat on the other side. 
Step 3
All you have to do is thread the leather cord through the holes.
Place the jewelry around your neck. Tie the cord in a bow or knot and leave the ends hanging freely. 
Ready! It is so easy that you can easily make a couple of such products and give them to your friends.
Video instructions: how to make a choker
Below are several videos on how to make a choker from various materials with your own hands.
We hope you enjoyed our master classes? And if you have any questions or suggestions, write them in the comments below. Happy handmade!
This simple neck decoration became popular back in the 90s, especially among young people. If back then it was more often bought in a store, today there are ways to make such a short necklace yourself. Fishing line, ribbons, velvet, lace are just some of the materials from which you can weave a choker. These and other master classes are presented below.
DIY choker
Now this decoration is gradually coming back into fashion. Due to its tight fit, a short necklace emphasizes the girls’ thin, graceful neck, although chokers can also be worn on the wrists. You can even make a bracelet and necklace set. Using different materials, it is easy to make chokers with your own hands for any outfit - everyday or evening, and the whole process does not take much time and effort. The simplest of them are made from fishing line, floss threads, ribbons or rubber bands. There are more complicated options - made of lace, velvet and even precious stones.
According to history, this decoration originates from the Indians. For them, wearing a choker was necessary for protection during battle. For this reason, the men's model was the first to appear: it was very simple, without any additional decorations, outwardly it was an ordinary lace. Gradually, women simply borrowed such jewelry and made the sample more original by adding various details.
Materials for chokers
Modern chokers are not necessarily jewelry. For the decoration and decoration itself, a variety of materials are used:
- leather;
- lace;
- textile;
- floss threads;
- rhinestones;
- pieces of fur;
- textile.
What else can you make a choker from? An equally effective option would be chokers made from ribbon or fishing line and beads. In the latter case, both ordinary beads and bugles, which have an oblong shape, are suitable. Instead of fishing line, wire or spandex is often used, i.e. elastic polyurethane thread. The original option is chokers made of round wires from charging or headphones.
Choker weaving patterns
There are many different techniques for making such jewelry. The specific pattern of weaving a choker around the neck is determined taking into account the materials used and the purpose - for an everyday or formal occasion. The main techniques are as follows:
- "Pigtail." The most affordable and easiest option, because everyone knows how to braid hair. Regular, reverse, spikelet, 4 or more strands - you can use any one.
- "Knot Technique". One of the popular patterns for chokers. From the name it is clear that weaving occurs by tying knots alternately on each half of the cord.
- "Double Knot" This technique is a little more complicated than the previous one. Weaving requires 4 threads, which are numbered for convenience.
What types of chokers are there?
As the popularity of chokers grew, the number of their types also increased. The main classification divides them into male and female. Representatives of the stronger sex can also be found with such jewelry on their necks. They wear different types of chokers - with bones, fangs and other similar accessories. The jewelry itself is often made of leather and is characterized by minimalism. Women's models are more original and varied in appearance - wicker, leather, openwork, velvet or velor. The latter reflect the traditions of the Indians. There are hippie style chokers - they are woven from fishing line.
You need to know about the types of chokers in order to choose a specific model for your look. Such jewelry is not suitable for tightly closed blouses or sweaters, because they are worn on a bare neck. Any clothing should have a small neckline. Options for what to wear a choker with can be:
- A light loose-fitting dress or a shirt with an open collar. Velvet will suit them.
- A leather biker jacket and a loose blouse will look perfect with a black collar with studs or even spikes.
- Little black dress for an evening out. A velvet choker with a single stone, beads or rhinestones is optimal for it.
- Clothes made from cotton, leather, suede, linen and other natural fabrics look very beautiful if you add a short braided necklace to the look.
- A fashionable knitted top, a light summer blouse or a lace dress. A beaded choker looks better with these clothing models.
- A satin ribbon simply tied around the neck will go well with regular shorts and a summer top.
Velvet around the neck
A women's velvet choker looks original and even very rich. Its advantage is that you can choose almost any color scheme. There are so many varieties of velvet that you can easily find a suitable option: bright purple, cherry, red, green or blue, black - these are just some of the colors. To make it, only 7 cm of fabric of the selected shade is enough. If the minimum width of the material is 150 cm, then you will get 3-4 chokers per neck at once.
Choker tattoo on neck
One of the unusual models of such jewelry is considered to be a tattoo choker. The name of this necklace says it all: it is meant to resemble a tattoo. For this reason, black fishing line, spandex, and headphones are used for production. Due to such materials, the bracelet fits very tightly on the neck – so it is practically indistinguishable from a real tattoo. For variety, a tattoo choker is often complemented with rhinestones, beads, ribbons or pendants.
Choker with pendant
A separate variety is a choker with a pendant in the form of a pendant or brooch. The basis of such decoration can be any material, be it leather, fishing line, velvet or other fabric. In any case, their distinctive feature is the pendant - it can be bought in a store or ordered online. A small ring is required for hanging. This type of choker also includes men's versions with a pendant in the form of a bone or fang.
The original model has denim fringe. It’s easy to make yourself; you only need old jeans (although fringe is often made from floss threads). You just need to tie a knot on each one and then connect them all together. It turns out to be a bright, original accessory for a fun costume party or everyday outfit.

Lace choker
If the choker is lace, then it gives the image additional romanticism. This is an ideal accessory for an evening outfit, especially if the jewelry has not yet been selected for it. Even older ladies use such a choker to emphasize a delicate feminine look. A wide and embossed lace ribbon is more suitable for them - it gives a special status. For younger girls, a narrow ribbon is ideal.
Choker tatting
Another special type of decoration is the tatting choker. The technique of its manufacture involves weaving a lace fabric from small knots. In this it is similar to the method using a hook, but there is a difference: the threads are threaded through the knots differently. Even earrings are woven using this technique - you get a whole set of jewelry. In the classic version, they simply take ready-made rings and tie them. There are also more complex methods, where the lace fabric is crocheted or even with a needle.

How to make a choker with your own hands
It’s no longer easy to find such jewelry in modern stores, and why waste money. The secret of how to make a choker at home has not been a secret for a long time. You can weave it for yourself or as a gift to a friend. For the last option, a good idea is to make two identical chokers. Keep one for yourself and give the other, for example, to your sister or friend. It depends on your wishes.
In the simplest version, how to make a choker around the neck, only fishing line is used. For variety, you can add a few beads or larger beads. To make such a choker you will need:
- any color and thickness of fishing line;
- carabiner for jewelry;
- a thick book with a hard cover;
- binder;
- pendant, beads or other small details as desired;
- lighter.
You can decorate the choker as you wish. Any small pendant or pendant, beads, glass beads - all this is suitable for decoration. The instructions for making a choker are very simple and consist of the following steps:
- If you are new to this business, then you should measure out larger fishing lines - about 3 m.
- Cut and bend in half, pressing the fold in a book.
- Place the left part of the fishing line on top of the right one, and take the right one to the left and pass it under the right one, as shown in the photo. You should get a knot.
- Next, do the same, only in mirror image.
- Continue weaving the choker like this until the required length, stringing beads or beads as needed.
- At the end of the weaving, trim off the excess, melt it with a lighter and secure with a carabiner.
Using this technique, you can make chokers not only from fishing line: it’s so easy to weave a necklace from old headphones or chargers, but they should not be too thin. Otherwise, the weaving may not work out or the choker itself will be too voluminous - then the decoration will only shorten the neck and not emphasize its elegance. To diversify the weaving, it is recommended to take fishing line or wires of several colors.

Headphone choker
You don’t have to throw away old things right away - they can turn into new interesting items, including jewelry. Do you still have old or broken headphones? You can make a choker out of them. If thin wires are braided correctly, they can easily pass for elegant lace. Although thick ones are also suitable, because it all depends on what kind of necklace you want to get. For decoration you can use large beads or glass beads. The technology for weaving a choker from headphones is very simple. It includes the following steps:
- For beginners, it is better to take two wires at once. Their ends need to be connected and secured with a binder or just a book.
- Next, place the left wire on the right, the end of which is pulled underneath to form a loop. It needs to be tightened to the base.
- Then repeat the same thing, only in the other direction, tightening the loop from the left wire.
- Continue weaving like this until you reach the required length. During the process, you can add beads, and even make a pendant in the middle.
- Trim off the excess, melt the ends with a lighter, and attach clips to them.
If you have not yet figured out this weaving technique, then try a simpler option. For this you will need old thin headphones. They should not be too scratched or already completely worn out. Additionally, you will need the following materials and tools:
- glue;
- nail polish;
- brush;
- gold leaf.
If you already have all this at hand, then you can proceed:
- Cut off all unnecessary parts of the headphones so that only the wire remains. The ends can be melted using a lighter.
- Next, apply glue to the ends, wrap them with gold foil, and secure it with colorless varnish on top.
- No clasp is required here - the choker is simply tied around the neck, making a bow in front.

How to make a choker from ribbon
If you need to quickly make a short necklace, you can try making your own choker from ribbon. Back in the 19th century, such necklaces were preferable to the massive jewelry that was common at that time. The classic option is a satin or velvet ribbon with a voluminous pendant made of precious stones or pearls. It looks very elegant and rich. Such decoration only emphasizes the taste of its owner, while making the decoration is very simple. You will need the following:
- scissors;
- gold ring, brooch or beautiful pendant;
- glue;
- a ribbon of satin or velvet, slightly longer than the circumference of the neck.
If you have all the materials and tools, the work procedure includes the following steps:
- Pass the tape through the pendant mount and fix it in the center with glue.
- If you are using a ring, you can do this - take not one, but two ribbons, pass them through the decoration, and then spread them in different directions, as if you are trying to stretch the product.
- Next, it remains to tie the edges of the ribbon with a bow at the back. If you cut it to fit the neck circumference, then you need to install special fasteners at the ends.

DIY velvet choker
If you especially like a velvet choker or it just goes with a certain outfit, then try making this decoration yourself. To do this, you will need tools and materials from the following list:
- scissors;
- fasteners;
- threads in the color of the selected velvet;
- sewing machine.
The most important material is velvet. The length should be equal to the circumference of the neck plus a little at the bend. The same goes for width. It can be adjusted independently - 1, 2, 3, 4 cm. If everything you need is already at hand, then proceed to the sewing itself. The technology includes the following stages:
- Cut a strip of fabric of the required length and width, bend it in half along the grain line, and iron it.
- Next, fold the edges inward 0.5 cm. Iron them too.
- Use a machine to sew a neat seam and attach a fastener to the ends.
- Decorate with accessories as you wish.
It is better to sew black velvet under an evening dress. Fashionistas also love this option because it is suitable even for a casual outfit of jeans and a T-shirt. This velvet shirt is considered classic, so it should be in every girl’s wardrobe, just like a little black dress. You can take any pendant. Gold or bright red will look rich.

How to make a choker from threads
Fans of bright jewelry will definitely love this DIY choker made from thread. They are used for embroidery, but are ideal for creating this type of product. The choker is slightly wider than previous models. Due to the variety of threads used, it is very bright and colorful, suitable for an everyday look or a fun party. To make such a choker, you will need the following:
- pliers;
- multi-colored floss threads;
- small and large chains;
- carabiner for jewelry;
- plastic decorative chain with rhinestones;
- needle.
When making it, you need to take into account the following - you need to weave a braid out of threads. When finished, it will be somewhat shorter than the threads themselves, so it is worth cutting them not exactly to the circumference of the neck, but a little longer. Further instructions look like this:
- Fasten the floss threads into a bundle, wrapping them tightly.
- Next, braid a regular braid of the desired length. Wrap the ends too to secure.
- Decorate the braid by sewing a chain with rhinestones in the center.
- Next, decorate the sides of the decoration. Sew a large and a small chain to them.
- Use connecting rings to secure a thin chain and a carabiner lock.

DIY lace choker
To make a lace choker with your own hands, you also need a minimum of materials and tools. It will look more beautiful if you hang some accessory, for example, a pendant, in the center. In addition, you will need the lace ribbon itself with a length slightly longer than the circumference of the neck and clasp. If the material is too light, you will also need tape. The choker manufacturing technology is as follows:
- Cut the lace ribbon to the required length and sew it to a ribbon of the same color.
- Attach a pendant or pendant in the center.
- Secure the fasteners along the edges as shown in the photo.
How to weave a choker from rubber bands
Nowadays, rubber bands for weaving have become very popular. You can make anything from them - small bracelets, rings, toys, phone cases and much more. No one is stopping you from trying to weave a choker out of rubber bands. It will turn out very bright and colorful. The simplest weaving technique is called fishtail. Even if you don’t have a special machine and hook, you can easily handle it. For weaving you will need the following:
- multi-colored rubber bands;
- carabiner for securing ends of jewelry.
The latter material is often sold along with the rubber bands themselves. Only fingers will be involved in weaving. First, practice, and only then start making the necklace itself. Instructions on how to make a choker from rubber bands look like this:
- Place the first elastic band on your index finger with one end and on the middle finger with the other, crossing it as shown in the photo.
- Add two elastic bands on top, over which tighten the loops of the bottom one.
- Add another rubber band, repeat the steps of the second step.
- Weave a necklace of the required length in this way.
- Remove the last two rubber bands and insert a carabiner into the loop. Attach the second end to the beginning of the choker.

DIY beaded choker
In the case of weaving a choker from beads, the work is more painstaking, although there are very simple options here too. For one of these you will need:
- strong thread;
- multi-colored or plain beads.
From such simple materials you can make a very stylish and original choker, spending a minimum of time. The manufacturing technology includes several simple steps:
- Fold the thread in half and make a knot to create a loop about 2 cm long.
- Put the first bead on the right side and pull the left one through. Tighten the threads.
- Repeating the steps of the second step, weave a choker of the required length.
- At the end, make a knot again to secure the thread.
- Attach a carabiner for jewelry.
Do you want to weave a more complex choker with your own hands from beads? Then the following instructions are for you. You can’t do without a weaving pattern. The product turns out to be openwork, this is an excellent alternative to a lace choker. Beads can be taken in any color or even several shades. A good option is white or soft beige - then the product can even be worn to a wedding. In addition to the beads you will need:
- bugles of the same colors;
- carabiner for jewelry;
- fishing line
Instructions on how to weave a choker look like this:
- Attach a double fishing line to the eye of the lock.
- Using a needle, insert the first glass bead.
- Then divide the double fishing line - thread each one into its own needle.
- Next, work according to the diagram in the photo, alternating the same stage - first a glass bead, a bead, a glass bead for each part of the fishing line, then thread the needles through one bead.
- Do this to the desired length, then attach the carabiner, unfold the weaving and use the second pattern.
Video: how to weave a choker from fishing line
Today you can see it on bloggers, stars and ordinary fashionistas. We have already written in detail about fashionable neck jewelry on the website. Let us remind you that the choker was the leader in the year. The list of the year also includes a velvet version of the “collar”. They come in several types, but the most popular are decorations made from fishing line or wide ribbon. Most of them are pretty easy to DIY, like this velvet ribbon choker with a cute pendant.
DIY choker: popular manufacturing methods
Having examined this fashionable decoration, the conclusion suggests itself: it is very easy to make a choker with your own hands!
- We already told you in our publication! The decoration turns out no worse than what was purchased on a Chinese website!
- A spandex choker is made in the same way, but you need to look for elastic thread in specialized stores.
- Making crocheted jewelry takes a lot of practice!
- - an original idea. The site's experts offer 4 fastener options for it.
- A simple one can be woven in many ways.
- We will teach you how to make a choker from a ribbon quickly and easily!
Create your own collection of jewelry to match different outfits!
If you don’t know how to make a choker from a ribbon with your own hands, this master class will not only help you, but will also prove that it is very easy. We deliberately did not use complex techniques and unusual fittings, which are not available everywhere. You can make this choker necklace in 5 minutes from scrap materials.
If you don’t have a velvet ribbon on hand, you can use satin or grosgrain ribbon. The colors can be any: black, white, dark blue, dark green, or wine-burgundy, like ours. Regular lace is also suitable, which can be used separately or in tandem with the selected ribbon.

The role of a lock can be played by a special clip, which can be bought at a craft store. If you don't have one, you can use improvised means. It could be a button, an old purse buckle, or a pin. You can simply tie the ribbon at the back of your neck into a beautiful bow.

Use a seam ripper to make a hole where you will place the ring for the pendant. If you don't have one, an awl, a very thick needle or nail scissors will do.
The edges of the tape will need to be charred. Matches or a lighter are suitable for this. You can also hold them near a candle flame for a couple of seconds.
How to make a choker: master class
Before you know how to make a choker from ribbon, you need to acquire the necessary materials. To work you will need:

- a pendant that can be removed from an old decoration or bought at a craft store;
- a button to match the ribbon or pendant;
- scissors;
- pliers;
- thread and needle;
- centimeter.
How to make chokers from ribbon: stages of work

DIY choker is ready!
As you can see, there is nothing complicated about this. You will need the most common household items that almost everyone has at home, so you can make such a decoration even before you leave the house.
In this article you will learn about what a choker is and how to wear it. A choker is a necklace that fits tightly around the neck, which has not gone out of fashion for many centuries and is popular in our time.
Few people haven’t shed tears over Luc Besson’s masterpiece “Leon.” And the image of Matilda is firmly entrenched in the memory of many, many movie lovers. One of her calling cards was a necklace that fits tightly to her neck. Of course, fashionistas couldn’t ignore this accessory.
However, they wore a choker long before the film’s premiere and after it. What is the popularity of this jewelry, what is it all about and what can it be worn with?
What does choker mean?
The word “choker” is literally translated as “noose”, “means of suffocation”. And it’s not surprising, because the accessory fits tightly around the neck, creating such an appearance. Of course, the choker will not choke you due to the fact that its length can be adjusted at your discretion.
However, it is definitely worth learning more about this decoration, because previously it, so strongly reminiscent of a tattoo, hid a considerable meaning. It is not for nothing that the inventors of the choker are considered to be Indians, for whom everything is imbued with symbols. Such a neck bandage was considered protection and was made from wood, animal fangs, bird bones, and shells.
The thing was quite durable and could really protect physically, however, in addition to this, it was also considered a talisman. The most ornate symbol of greatness was, of course, that of the leader. Manufacturing was entrusted exclusively to healers.

Centuries later, the little thing captivated noble ladies in Europe. Thanks to this necklace, the neck visually became longer and more graceful. This was appreciated by the famous fashionista of those times - Queen of England Anne Boleyn, whose necklace with the first letter of her last name was remembered for centuries.

Anne's daughter, Elizabeth I, who, like her mother, adored fashion, also wore jewelry around her neck.

And here is the famous portrait of a lady with an ermine by Leonardo da Vinci. As you can see, the lady’s neck is tightly wrapped around the necklace, which consists of several layers.

Margaret of Saxony, who was the wife of the Elector of Bradenburg, also wore a choker with an impressive pendant.
 The legendary fashionista and last queen of France, Marie Antoinette, of course, could not ignore the neck band. As creepy as it may be, Marie Antoinette gave rise to a certain trend even after her death - in memory of the victims of the guillotine, some preferred to place a red ribbon around their necks. Later, such ribbons began to be decorated with embroidery, stones or beads.
 During the time of Queen Victoria, necklaces with an abundance of jewelry did not fit into the strict framework of classicism, although the queen herself was not averse to wearing neckbands. Alexandra, the princess of Denmark, who married the heir to the throne of England, revived chokers. Due to an injury received in childhood that left a scar, the woman was forced to somehow hide it. It turned out to be difficult to hide the flaw with ordinary velvet, so it was decided to make several rows of pearls and diamonds.

Her daughter Victoria also preferred chokers.
 The legendary Coco Chanel gave the choker a new lease of life, making it the main focus of her collections. Her necklaces were ribbons made of leather, velvet or silk. An innovation was the film insert - insert.
Chanel preferred to use precious metals as tablets. After Chanel, tablets became quite popular. An example of this is Princess Diana.
 As you can see, a choker can be completely different - consisting of one or several rows, made of different materials, with or without decorations. There are also no age restrictions for wearing it - if chosen well, it can look great on both a young lady and a mature lady.
There are no restrictions even on gender - there are also male options. Modern designers also love this jewelry, especially John Galliano, who shows necklaces from collection to collection. You can also see chokers in the movies.
 What is the right way to wear a choker?
What is the right way to wear a choker?The choker is quite a bold decision - it is quite bright and catches the eye. Therefore, it is extremely important that this decoration is in harmony with the clothes, so that one style is present.
IMPORTANT: The choker cannot be called a universal wardrobe element. Despite the fact that a suitable decoration can be selected for many styles, business is not one of them. Don’t even try to choose a choker that matches a jacket or a formal blouse - it won’t work.
So, let's go through the styles that this unusual decoration can successfully complement:
- Victorian style with truly luxurious materials, precious materials will perfectly complement the same necklace. A good solution would be to include some kind of miniature in it - this used to be popular. If you are going to a ball or some other event where you can dress in style, an ornate choker will fit perfectly into the look.


![]()
- If a gloomy style like gothic is close to you, then trying on a choker is your responsibility


- Punk or rock styles will be successfully complemented by products consisting of decorative pins, leather, chains, rivets or spikes


- Everyday style can also be decorated with a choker, but it should be as simple as possible and not burdened with massive details. For example, this decoration goes well with checkered shirts and T-shirts. This decoration can be either velvet or wicker.


Satin fabric also works well. For example, under a top and jeans
![]()

- Evening style - how can we ignore the classic combination with a black dress that Coco Chanel liked so much? Delicate necklaces will look great with it. However, some bright accents won't hurt. This also includes flowing floor-length dresses, with which chokers look great


- Ethnic, hippie, safari - here chokers just fit like a glove. And this is not surprising if you remember who invented them. Clothing should be made of linen, suede, leather. The main thing is that it is bright. Like a necklace in which pebbles and shells are desirable


IMPORTANT: If you decide to add a choker to your look, it is better to avoid other neck jewelry. Perhaps the only exception is gold or silver chains, which are much longer than the choker. In this case, you get a very interesting dynamic ensemble.
 Types of chokers
Types of chokersNowadays you can find a variety of chokers from expensive to more affordable ones. However, in both cases you can create your own style. Jewelry varies in material, accessories, and colors. We have already looked at the types of chokers from a historical perspective. Let's try to look at them from the point of view of modern trends:
- Men's chokers are a stylish decoration with a minimum of additional elements. They are a cord in one row, sometimes in the form of beads


- Tattoo choker is one of the first types of this decoration - it was with it that the Indians once went into battle. Moreover, as you can understand, it was worn mainly by men. Despite the fact that it is made of thin material, it stretches perfectly
- Thanks to this, it fits around the neck and does not choke. Due to its external resemblance to a tattoo, this decoration received its name. The colors can be completely different, as well as the design - although the tattoo choker is quite laconic, interspersing beads is possible


- For admirers of brevity, chokers that consist of only one cord, one fishing line, ribbon or chain will be a real find. Such decoration will look equally appropriate both at special events and in everyday life. If you want to make a small accent, you can add a small pendant to this choker


- A braided choker is a more elegant option. It is a weave interspersed with beads, rhinestones, seed beads, stones, and chains. Such necklaces can already vary in length - for example, if there are chains, then the choker goes down below the collarbones


- And this is for lovers of everything knitted - yarn chokers. Yes, yes, such options exist. Very soft and cozy decorations that will not only decorate, but also warm like scarves.

- Chokers, which resemble stand-up collars, were extremely popular several centuries ago. They still look very stylish. Materials from which such chokers are made - flounces, openwork ribbons, lace

- The next type of necklace is made entirely of beads or beads. They are no longer just an addition, but the main canvas of decoration.


- The wire choker looks quite unusual. The material is similar to a tattoo choker, only more elegant

- A leather choker may also appeal to some fashionistas. It is quite stylish, and is great for those who are wearing this necklace for the first time, as the material does not rub the skin of the neck

- And finally, here is an option for brave girls - chokers with spikes, decorative pins and similar decorations. Suitable for punk, rock styles

Metal choker
Metal choker
Such necklaces can be suitable for everyday wear in the form of jeans and sundresses, leather jackets, and evening dresses. We can say that this is an almost universal decoration.
IMPORTANT: However, there is a significant limitation - only ladies with long necks can afford to wear metal chokers. Examples of this are Audrey Hepburn and Coco Chanel. On such girls, metal jewelry will look great. But for a lady with full shoulders and a short, full neck, it is better to avoid such necklaces.


 Wide choker
Wide chokerThis decoration is very similar to a turtleneck collar, especially if it is made of fabric materials. Of course, such severity should be set off - let such decorations be with light motifs. Painted velvet or white lace, for example, work great. And it is very important that a wide choker is not worn at the same time as a large collar on a jacket.
This will visually give the neck even more volume, which is not suitable for anyone. Although some women wear such combinations. In general, it is ideal to match a wide choker to a jacket, top or dress with a neckline for a lady with a long neck.


 Beaded choker
Beaded chokerThose ladies who cannot boast of a long neck can choose a beaded choker. Small beads will add grace and neatness. If you are not sure what exactly will suit you, start with beaded jewelry like this - they will not harm the image. Large beads can also fit into small beads. This sparkling beauty can be worn under a dress or combined with jeans and tops.


Beaded threads with beads can also be wrapped into strands, which, in turn, form a necklace. Moderately wide and extremely elegant decoration. Additional elements in the form of pendants are welcome.

 Lace choker
Lace chokerA rather elegant necklace that can soften the lines - it can visually make the neck thinner. White lace, completely airy in appearance, will add especially tenderness. An excellent solution would be to choose such necklaces with beads and pendants. The lace model is best chosen when there is a desire to recreate the Victorian style.


 Velvet choker
Velvet chokerWomen of the 18th century noticed that a velvet bandage around the neck perfectly sets off the whiteness of the skin, which they actively used. This black ribbon will suit almost any style, depending on the decorations on it. However, even if you don’t want to be overloaded with elements, a pendant or pendant won’t hurt. No wonder aristocrats loved this necklace, because it is simple and at the same time elegant.


Velvet goes great with lace.


Velvet may not necessarily be black.

Or it can be a simple decoration without decorative elements.
 Leather choker
Leather chokerA leather choker will appeal to lovers of all things natural - for example, ethnic style. In this case, a leather harness would be an excellent option. Leather chokers will also appeal to fans of the rock style, as they go well with leather jackets. A product of this kind can either consist of a small strip of leather or be wide.


Skin can be completely different colors.

 What is a choker and what to wear it with: tips and reviews
What is a choker and what to wear it with: tips and reviewsWomen argue a lot about how long a choker should be, but everyone agrees that the universal length is 35-40 cm - it does not suit many people. In addition, such decoration can be successfully combined with any clothing - both with a men's shirt and with a dress.
Also, various experiments by ladies with style have shown that it is better not to wear many other jewelry at the same time as a choker. If you still want to somehow dilute your look, you should choose non-bulky earrings and a bracelet that harmonize with the necklace.

Girls who do not have a long neck, but want to wear a choker, can benefit from the following experience of other ladies:
- Choose the simplest possible decoration that matches the skin. In this case, it will not create a pronounced transverse stripe and, as a result, the neck will not be visually shortened

- The so-called phalangeal open rings seem weightless and do not burden the neck. On the contrary, they seem to make it a little longer

- Chokers in the form of laces made of leather with metallic inclusions look very stylish and, in addition, create a vertical line, which is especially important if you need to visually lengthen your neck

IMPORTANT: The thinner the choker itself, the less it shortens the neck. This is the golden rule of every fan of such a necklace. A narrow choker will not harm your look at all.

Cutouts are a different story. If the clothes do not have a pronounced neckline, then at least the neck should be open. However, let's talk about this in more detail:
- V-shaped is the most successful. Especially in combination with a necklace of light colors, especially if this necklace is multi-layered, where each layer is noticeably longer than the previous one. The more open the body is, the more weightless the decoration seems, the less it “suffocates”

- Round - ideal for jewelry with the same smooth line. This creates visual harmony. If the choker is elongated, then the neckline can be adjusted by wearing a vest or jacket

- Boat Neck - Pairing a necklace with this neckline is similar to pairing it with a crew neck. The lines of decoration and clothing should be in harmony and smooth

As you can see, every woman can choose a choker to her liking; even men will find this decoration at the right time. If you want to add bright colors to your image, make an accent, do not doubt that a necklace close to your neck will do. The “Strangler” will not be able to strangle your sense of style if you use the recommendations for its selection.
Tweet
Cool
This season I can’t help but feel like trendsetters just threw away all the jewelry they had and bought all kinds of chokers instead. The choker necklace has become so fashionable this season that you will hardly see any other necklaces except for all kinds of choker variations. It is worn by celebrities, models, fashion bloggers, and in general everyone who is at least somehow interested in fashion.
To be fair, it must be said that a choker is a universal thing and will suit almost any outfit. A thin velvet cord tied around the neck can be worn with either jeans or a dress, and a diamond collar should be worn on the red carpet. But today we are not talking about diamonds, but about how to create a fashionable choker necklace with your own hands.
Of course, you can not complicate your life and just buy a choker; fortunately, the choice in stores is now huge. But the prices for this trendy item are quite high. But you can create a choker with your own hands for literally pennies. Plus, you can always choose the color and accessories to your taste. So for those who like to save creative ideas, today I offer a few master classes on making a choker with your own hands.
Fashionable choker with your own hands
The first master class is not the easiest, but interesting and suitable for those who really like to create creative jewelry. We will talk about the so-called “choker tattoo”.


Maybe someone is feeling nostalgic for the nineties now? That's right, back then such collars were also in fashion. And since the trends of the 90s have returned, this decoration has returned along with them.
It’s easy to make such a choker with your own hands. For this you will need:
Elastomeric thread (also called beading thread. Look for it at fabric and hardware stores or craft stores)
A little patience
The process of creating a choker: secure the beginning of the thread as convenient for you (on a table or book) and weave according to the pattern shown in the photo below.


To make it more clear, you can watch the video lesson. In it, by the way, the girl suggests not even buying thread, but using old headphones. Very creative solution!
DIY ribbon choker


The easiest way to make a choker with your own hands is to simply buy a ribbon of the appropriate width and color and tie it beautifully around your neck. If you want to do everything neatly and thoughtfully, you can attach a fastener to the ends of the ribbon. You can also add various accessories, for example, a metal ring in the middle. All these options are very simple to implement, so below I’ll just give photos of the master classes.
In this master class, although the girl ties the ribbon into a bow, she still suggests finishing its edges with beautiful metal fittings.


In this master class, the girl suggests simply attaching a ring in the middle of the ribbon using glue


Cord choker


For such a choker, it is best to take a leather or suede cord. Again, look in a fabric store; the price of such a cord is usually not at all high. You can attach metal tips to the ends of the lace - it will be both beautiful and convenient. The use of any other accessories is welcome.


Video master class on creating a choker from a cord
Choker with chains
Metal chokers are also in fashion, so we suggest you add metal to your look. Let's take a strip of black leather as a basis, glue a metal chain on both sides and secure it along the edges of the clasp. The choker is ready.


Chanel style choker
An unusual and stylish version of a choker, but to create it, you will have to look in craft stores for suitable pearl-like beads and a metal base for the choker (or use thick wire).


DIY lace choker
A lace choker will look great as an evening decoration with an open dress. It's easy to make, and it will look like a million! For this you will need: lace, brooch, ribbon. Cut out the desired lace pattern, fasten the brooch and sew on a ribbon, which in this case replaces the clasp.


I suggest watching a video tutorial that shows the process of creating three different chokers (tattoo choker, lace choker and suede cord choker). Here the girl explains in detail and clearly all the stages of creating jewelry and shows how to attach the clasps correctly and beautifully. So if after the photo lessons you still have questions about how to do what, then this video master class will definitely clear up all your doubts.
And if you want to find more ideas for creativity and inspiration, we suggest you take a look at the album Choker - a fashionable decoration, which contains many beautiful photos of this accessory.
Oddly enough, many girls, hearing this unfamiliar word, will raise their eyebrows in surprise and ask: “What is a choker?” Moreover, it will not occur to most of them that some have already worn this jewelry before, while others still wear this jewelry.
What is a choker
The peculiarity of this accessory is that it should have a fairly tight fit, as if justifying its name: after all, choker is translated from English as “strangler”, “to strangle”. However, these necklaces are not at all intended for masochistic pleasures; their main function is to decorate a woman’s delicate neck. Therefore, a choker is a bracelet around the neck or a collar, so to speak.
History of origin
The history of chokers goes back to the distant past. In North America, they were worn by some who believed that these jewelry warded off evil spirits. In Medieval Europe, women's neck chokers also had a place.

In general, this accessory either disappeared or became fashionable again in almost every decade until the 20th century. But it was only at the end of the 1990s that chokers became so popular that even girls of primary school age began to wear them. Now do you remember what a choker is? Yes, yes, these are the same necklaces woven from elastic wire. Black, lilac, yellow, most often they were sold complete with the same bracelet.
Of course, modern jewelry bears little resemblance to the historical choker (photo in the article). However, this does not make them lose any of their grace and intriguing elegance.
Modern chokers
Chokers rose to the peak of popularity again in 2014, and for several months now they have not given up their leadership positions. Today's accessories, unlike those worn by European noble ladies several hundred years ago, are now available to every fashionista.
If earlier chokers were made exclusively from precious metals (silver, gold, platinum), lace and expensive fabrics and decorated with gems, now the imagination of designers is resulting in no less interesting solutions from modern materials.
Today, a choker (photos of some samples are presented below) can be made of metal, leather, chains, velvet, fishing line, wire, thread, beads, and ribbons. Wealthy women can afford or, as in the old days, from precious materials.
To decorate the product, all kinds of beads, glass beads, stones, pieces of fur, pendants, fabric flowers and in general everything that the designer’s imagination is capable of are used. Some chokers may have pendants in the form of beads, either very short or quite long - up to the chest.
By the way, modern necklaces of this type do not always have a front clasp. Some models are worn backwards, but at the collarbones there is space between the “legs” of the choker; they are not connected to each other. Such products are made only from hard materials - others simply will not be able to maintain the required shape.

Celebrities and chokers
All centuries have had their famous fashionistas who served, in modern terms, as style icons for mere mortals and set the tone for outfits. Exactly the same story happened with chokers.
The most striking example, when almost all courtiers and noble ladies began to wear necklaces, is the period of the 19th century - the reign of Queen Victoria in Great Britain and Ireland.
The next monarch, Queen Alexandra (late 19th century), wore a choker solely for personal reasons - she was extremely embarrassed by the skin on her neck disfigured by an accident. However, the ladies-in-waiting and the nobility perceived this as a tribute to fashion and were not slow in sending similar orders to the jewelers.
The famous Gabrielle “Coco” Chanel, founder of the fashion house of the same name, returned chokers to their former popularity after a fairly long break. Along with the famous little black dress, necklaces made of precious metals, leather or velvet, decorated with pearls and stones, became a real hit among wealthy fashionistas.
A little later, a pearl choker became one of the most favorite jewelry of another royal person - Princess Diana.
In films, “collars” are also often found - on the heroine of Natalie Portman from “Leon”, Audrey Hepburn in “Breakfast at Tiffany’s”, Angelina Jolie in “The Tourist”, as well as in many historical films.

Today, chokers can be seen on many movie and show business stars: Rihanna, Nicki Minaj, Rita Ora, Miley Cyrus, Cameron Diaz - today's fashionistas have someone to look up to.
What to wear with a choker
Now that we remember what a choker is, it's time to find out what clothes it will look best with. The variety of materials and types of necklaces suggests the possibility of combinations with almost all styles of clothing. The only exception, perhaps, will be business and formal suits.
Jeans, leather jackets, tops, shirts will look good with massive or, conversely, thin chokers made of steel, fishing line, wire, chains, leather. Fabric necklaces decorated with pendants, beads, beads, and rhinestones will go well with feminine dresses, blouses, blouses or skirts. For an evening out under a suit, jumpsuit or dress, ornate chokers are best, perhaps even with long pendants if the neckline of the outfit is deep enough.
You may also be interested


