How to make a giraffe from beads. Crafts made from beads using different weaving techniques (diagrams and videos). Hind paw C
Painting with paints, how to make lampshades from paper, cutting out jigsaws - this is not a complete list of topics that are covered in Ingrid Moras's books. Those of you who are seriously interested in beadwork probably know this author from his books “Beaded Zoo”, “Beaded Baubles”, “Volume Beaded Figures” and “Beaded Animals”.

In these colorful publications, Ingrid Moras reveals all the secrets of weaving, provides detailed diagrams from which flat toys, three-dimensional beaded animals and other crafts are born. Let's flip through the pages of educational books and find out how you can weave, for example, the dolphin from the cover.


- For this craft we will need beads: white, blue, dark blue and black. You can string beads onto a wire with a diameter of 0.3 mm.
- We start weaving from the spout. Place one blue bead and two white beads on both ends of the wire.
- Next, we continue to alternately weave the back and belly of our toy using a volumetric method.
- From the above diagram it is clear how to make separate fins and correctly finish the tail of our craft.

All three-dimensional beaded animals are placed on wire (for example, brass with a diameter of 0.3 mm) to create rigid shapes. To make an elephant you will need 2.5 meters of wire, blue-gray beads for the entire craft, white beads for the tusks and two black beads for the eyes.
We start weaving from the tip of the trunk. By the way, all beaded animals start with either a nose or a tail. Their additional accessories in the form of manes, fins and ears have to be woven separately or in parallel.
We will make the trunk long. All schemes indicate repetitions of the report with an “x”. For example, “3x” means repeating the rows three times. Based on the diagram, in the place where there is an “x” in the 26th row, we will make tusks from white beads.
Thread an additional piece of wire through the first of the seven head beads and pick up 12 white beads. Thread the wire back past the first bead and push it through five more head beads. Take the second tusk and twist the ends of the wire.

For the ears, insert an additional piece of wire in the 29th row and for the legs in the 35th, 39th, 51st and 57th rows. The ears of the toy must be woven in a parallel way. Do-it-yourself beaded animals will look better if you constantly tighten the ends of the wire while weaving.
King of beasts made of beads
You can also start making a lion from the spout. There is no diagram, but there are step-by-step photos.
- We collect two black beads to represent the nose, and between them a pink tongue.

- We continue to weave using the top-bottom method.

- On the fourth top row, insert two more black eye beads.

- From the bottom row we begin to make strands of the mane. To do this, we collect one golden and five yellow beads. Go back through four yellows. One strand is ready.

- You can do the next strand in the same way.

- We will have all the strands through one bead.

- Weave a chain with fringe.

- Pass the other end of the wire through the bottom gold beads and tighten. The first row of the mane is ready.

- For our toy we need to make at least three rows.


Further weaving can be done from the elephant pattern.

Flat crafts made from beads, made in mixed media, look original. For example, to make this keychain, I first had to weave the usual flat fragments of the muzzle, and then switch to weaving the mane-fringe.

The tiger weaving pattern is so detailed and simple that one can only write about the details.
- We will make the animal using the bottom-up method using beads of three colors: brown, black and white.
- It is worth noting the original weaving of the ears of our toy. They are made in the form of two loops of 6 beads.
- The paws also end in loops.
- Once you've finished braiding the tail, go back to the face to make fluffy short antennae from thin wire or fishing line.


An original panel can be woven if you first bend the outline of a cow from thick wire. It’s better to do this with a cow already drawn on paper.

Now start weaving, filling the outline of the craft with multi-colored beads. Don't forget to stitch the rows occasionally so they don't diverge.

After completing the work, turn it over to the wrong side and coat it with a thin layer of glue.
It is not difficult to weave a figurine of a giraffe from beads, but it must be done carefully, since the animal itself is spotted and there will be inclusions of brown beads in the rows.
Materials
To weave a giraffe from beads with your own hands, you will need to prepare:
- beads No. 11 yellow, brown and black;
- wire with a diameter of 0.2 mm;
- fishing line
Step 1. Cut the wire into pieces. In total you will need four of them: one 150 cm long and the remaining three 40 cm long.
Step 2. Take the longest piece of wire and string 2 yellow beads on it. Move them to the middle. This will be the top tier of the first row. For the bottom tier you will also need 2 yellow beads.

Step 3. The weaving pattern for the following rows is as follows:
- 2nd row, top tier – yellow, black, yellow, black, yellow beads, bottom tier – 2 yellow beads;
- 3rd row, top tier – 3 yellow beads, bottom tier – 2 yellow beads;
- 4th row, top tier – yellow, black, yellow, black, yellow beads, bottom tier – 4 yellow beads.

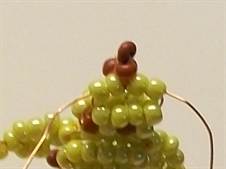
Step 4. In the upper tier of the 5th row, the giraffe's horns will form. Send 4 yellow and 1 brown beads onto the wire. Pass the wire in the opposite direction through the 2 yellow beads, pushing the brown one aside. After this, the wire should be tightened.


Pass the second end of the wire in the opposite direction through all the lower beads of this tier.
Send 5 yellow beads to the bottom tier.

Step 5. For the 6th row, collect 7 yellow beads and pass the wire through the penultimate one. Next, you need to collect 3 more beads on the wire and stretch its end through the sixth bead of the previous set. When you tighten the wire you will get a giraffe ear.

Add 11 more beads to the same end of the wire and form a second ear. Then string 1 bead onto the end of the wire and pull the second end of the wire through all the lower ones.


Send 4 yellow beads to the bottom tier.

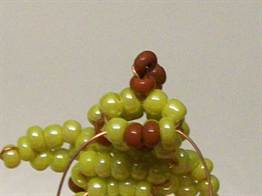
Step 6. For the top tier of the 7th row, string 3 yellow and 2 brown beads. Pass the end of the wire through the first brown bead in the opposite direction. Add 3 more yellow beads to the same end of the wire.


Pass the other end of the wire through all the yellow beads. This will give you the beginning of the giraffe's mane.
Send brown, yellow, brown and yellow beads to the bottom tier.

Step 7. In the 8th and 9th rows you need to form the next part of the mane. Also leave 2 brown beads, and reduce the number of yellow beads to 4. Send 4 yellow beads to the bottom tier of the 8th row. In the bottom tier of the 9th row, string beads in the sequence: yellow, 2 brown, yellow.

Step 8. The weaving of the 10th row completely repeats the pattern of the 8th.
Step 9. In the 11th row, the top tier is similar to the previous one, but instead of yellow beads, brown ones should be placed along the edges. Send brown, yellow, brown and yellow beads to the bottom tier of this row.
Step 10. The 12th and 14th rows repeat the pattern of the 8th, and the 13th – the 9th.
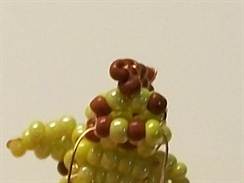
Step 11. In the 15th row, the mane is formed in the same way as in the previous rows, but in the middle, instead of yellow ones, brown beads should be strung.

In the lower tier you need to collect yellow, brown, 2 yellow and brown beads.
Step 12. In the 16th row, to form the upper tier, repeat the pattern of the 7th, and send 2 yellow, 2 brown and 2 yellow beads to the bottom. This will give you the head and neck of a giraffe.

Step 13. For the top tier of the 17th row, cast on brown, 3 yellow, brown and 3 yellow beads. Send yellow, brown, 4 yellow and brown beads to the bottom tier.
Step 14. In the 18th row for the top tier, collect 2 yellow, brown, 3 yellow, brown and 2 yellow beads. For the bottom tier, string a brown bead, 4 yellow beads, a brown bead and 2 yellow beads onto a wire.
Step 15. In the upper tier of the 19th row, string the beads in the sequence: 4 yellow, 2 brown, 4 yellow. Send brown, 4 yellow, brown, yellow, brown, yellow beads to the bottom tier. Thread an additional wire through the 7 middle beads of this tier.
Step 16. The sequence of beads in the top tier of the 20th row is: 3 yellow, brown, 6 yellow and brown. For the bottom tier, collect 7 yellow, brown and 2 yellow beads.
Step 17. The top tier of the 21st row consists of brown, 6 yellow, brown, 3 yellow, brown and 2 yellow beads.
Send beads to the bottom tier in the sequence yellow, brown, 4 yellow, brown, 3 yellow, brown. Pass additional wire through 7 medium beads.
Step 18. Send 2 yellow, brown, 5 yellow, brown, 4 yellow and brown beads to the top tier of the 22nd row. For the bottom tier, string yellow, brown, yellow, 2 brown, 6 yellow beads.
Step 19. To weave the top tier of the 23rd row you will need 3 yellow, brown, 3 yellow, 2 brown, 2 yellow, brown and yellow beads.
Send 4 yellow, brown, 3 yellow, 2 brown beads to the bottom tier.
Step 20. The top tier of the 24th row consists of 6 yellow, brown and 5 yellow beads. For the bottom one, string brown and 9 yellow beads. Pass additional wire through 8 medium beads.
Step 21. Send beads to the top tier of the 25th row in the sequence: 2 brown, 3 yellow, brown, 2 yellow, 2 brown, yellow. On the wire of the lower tier, string 3 yellow, brown, 2 yellow, brown and 2 yellow beads.
Step 22. For the top tier of the 26th row you will need to collect 2 yellow, brown and 6 yellow beads. Send 2 brown and 6 yellow beads to the bottom tier.
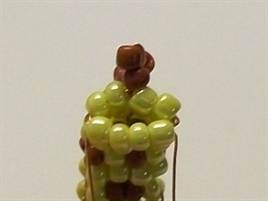
Step 23. In the upper tier of the 27th row you will need to form the tail of the animal. On the wire, collect 2 yellow, brown, 4 yellow, brown, yellow, brown, 2 yellow and 5 brown beads. Moving the outer bead aside, pass the same end of the wire through the 4 previous brown beads.

Then, collect 4 more brown beads and pass the wire through the previous 3, moving the outermost one. Having done this, pass the working wire in the opposite direction through 9 beads and string brown and 2 yellow beads. Pass the second end of the wire through the 3 outer beads on each side.


Send 3 yellow beads to the bottom tier. This completes the weaving of the animal’s body. Please note that there is no need to twist the wire or cut it at this stage. The ends will be needed to weave the giraffe's legs.

Step 24. All giraffe legs weave according to the same pattern:
- 1st row, top tier – yellow, brown, yellow beads, bottom – brown, yellow and brown beads;
- 2nd row, upper and lower tiers of 3 yellow beads each;
- 3rd row, top tier – brown and yellow beads, bottom – 2 yellow;
- 4th row, top tier – yellow and brown beads, bottom – 2 yellow;
- from the 5th to the 8th row, upper and lower tiers, 2 yellow beads each;
- 9th row, top tier – 2 yellow beads, bottom – 3 black beads;
- in the 10th row only the top tier is woven, consisting of 3 black beads.


At this stage, the wire needs to be tucked into the previous row, its ends should be twisted and cut.
Step 25. Sew the giraffe figurine with fishing line.

The beaded giraffe is ready!

Beadwork as a fascinating hobby unites people of different age categories. An option for joint creativity between an adult and a child can be animal figurines made of beads, made according to simple patterns. To make such a snake, you don’t even need diagrams of various beaded animals. In this master class for beginners, the snake will be green.
Figures made with your own hands and with the help of children's imagination will become exceptionally unique; a purple giraffe, a rainbow snake or a pink sheep can become an original keychain for an adult, a decoration for a girl, or another guest of a children's mini-zoo for a young animal lover.
Beaded snake pattern for beginners
To work for very beginners you will need:
- 50 cm of wire or thick thread;
- green beads;
- 2 large black beads;
- 1 red bead.
It is important that the size of the beads is a comfortable size for children's hands.
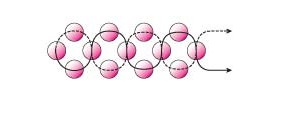
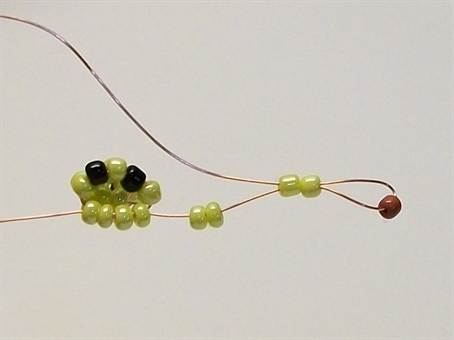
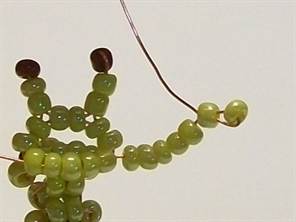
We braid the head
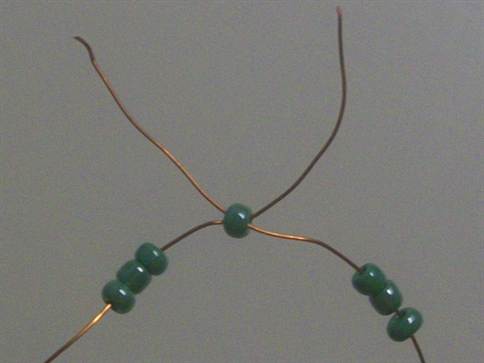
We take the wire and string the beads in the following order: green, black, two green, red, two green, black green. We move the beads to the middle of the wire.

We string two green beads onto both free ends of the wire.

Putting everything together, we get the head of a snake.

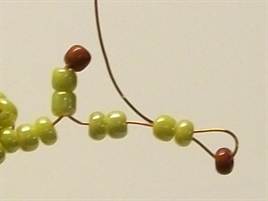
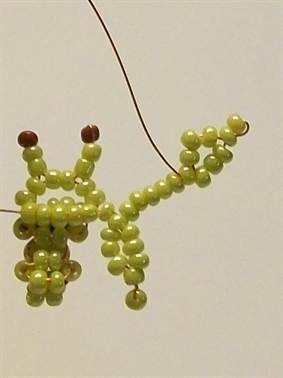
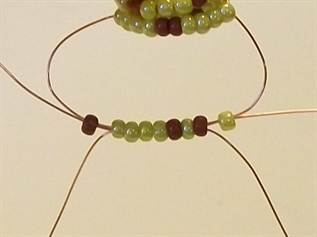
Making the torso
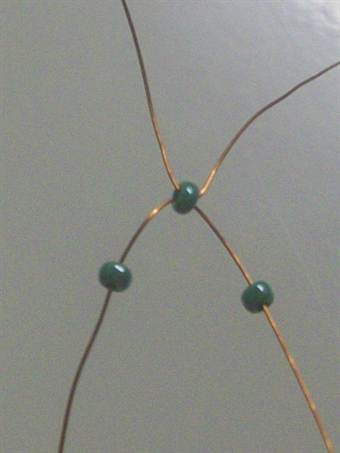
We put 3 beads on one end of the wire, and 4 beads on the other. Now we pass the wire with 3 beads in the opposite direction through the last bead in the group of 4.
Tighten the wire to make a ring.

In total we will need to make five similar rings. This way we get most of the snake’s body.

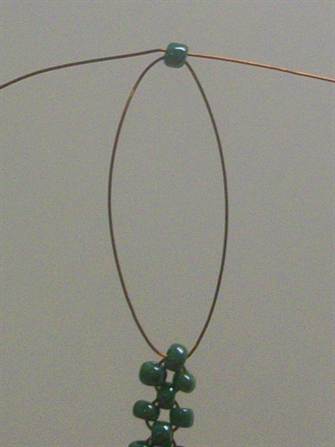
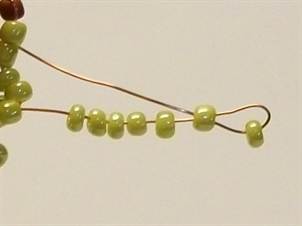
Now you need to make 4 more similar smaller rings, consisting of 5 beads each.


And finally we weave 4 more rings of three beads in a similar way.

Movable tail
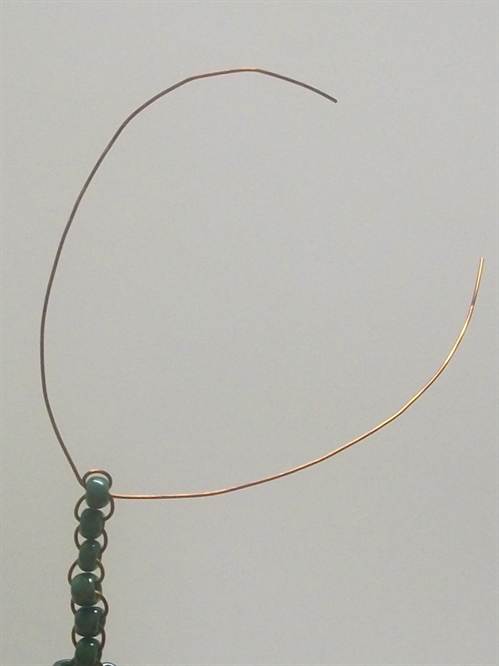
Let's braid the tail of our snake. To do this, string one bead onto either end of the wire and thread the other end through it in the opposite direction. And so on five times.

All that remains is to secure the wire. To do this, we pass one end of the wire through the last bead in the tail, do the same with the second end, and tighten the wire.

Let's do the same thing again.


To be safe, you can pass the wire in the same way through a few more tail beads.


Carefully cut the ends of the wire, straighten it and give the snake the desired shape. Ready! Now you know how to make a snake from beads.
Cute sheep with diagrams and job description
From simple to complex. To make a voluminous cutie sheep, you will need to follow this diagram:

You will need to weave two such parts.
Let's prepare working materials:
- small sharp scissors;
- stuffing material (cotton wool or padding polyester);
- fishing line;
- 2 large black beads for eyes;
- 2 red beads for the nose;
- 14 beige beads for horns;
- 16 hoof beads;
- white beads for the carcass.
Let's start with the tail
We weave a chain of crosses with 13 beads according to the diagram.
On the 13th bead, we cross the ends of the fishing line and continue weaving a new row.

We continue to weave according to the pattern. Don't forget to change the color to black when it comes to the sheep's hoof and eye. Also note that bead 107 in the diagram is red.
Now you need to braid the sheep piece with a cross, starting with 97 beads. First we braid the breast, then connect the hooves, as shown in the diagram.

When braiding a sheep's head with 107 beads, you should pass the right tip of the fishing line through it and, stringing white and red beads onto the left tip, cross both ends of the fishing line in the red bead.
Braid the other half of the lamb, connecting the single chains together. Don't forget to gradually fill the toy with cotton wool.
At the end of the work, we make horns from yellow beads and weave them to the 99 and 95 beads.
You can make a keychain from such a sheep, or use it in a composition with other bead products.

We weave an African inhabitant from beads
Finally, let's look at how to make a giraffe. We will weave according to this pattern:
To weave a giraffe from beads we will need:
- yellow beads;
- brown beads;
- 28 black beads;
- wire 0.2 mm in diameter - 150 cm and 3 pieces of 40 cm each;
- 70 cm fishing line.
1 row
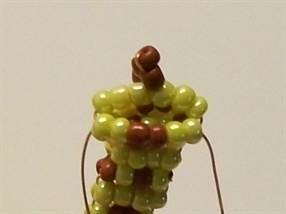
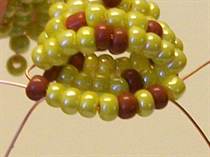
To make the giraffe voluminous, we will weave it in two tiers.
Let's start with the head. We collect 2 yellow beads on the main wire and place them in the middle of the wire.

Now we string 2 yellow beads onto one end of the wire, and pass the other end of the wire through them in the opposite direction.

We tighten the wire.

2nd row
We collect beads in the following order: 1 yellow, 1 black, 1 yellow, 1 black, 1 yellow.

We wrap the wire on top of the previous row. From the side it looks like this:

And this from the back:

In the lower tier there are 2 yellow beads.

3rd row
Upper tier - 3 yellow beads; lower tier - 2 yellow beads.

4 row
Upper tier - 1 yellow, 1 black, 1 yellow, 1 black, 1 yellow; lower tier - 4 yellow beads

5 row
Upper tier - 4 yellow, 1 brown.

Holding the brown bead, pass the same end of the wire through the 2 closest yellow beads.
We tighten the wire.

On the same end of the wire we collect 4 more yellow and 1 brown beads, and pass it through the 2 closest yellow beads in the opposite direction.
We tighten the wire.

We collect 2 yellow beads on the same end.

We pass the other end in the opposite direction through 6 yellow beads and tighten the wire.

Bottom tier - 5 yellow beads.

Side view:

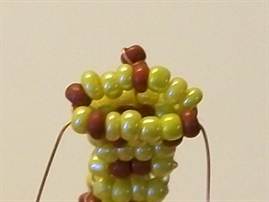
6 row
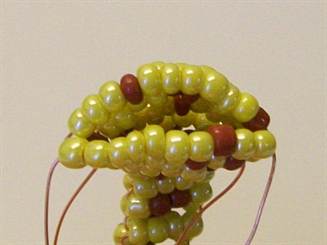
Upper tier - we collect 7 yellow beads on the wire, after which, holding the last bead, we pass the same end of the wire through the bead closest to it in the opposite direction.
We tighten the wire and get the tip of the giraffe's ear.
We collect 3 more yellow beads on the same end of the wire, and then pass the same end of the wire through the 6th bead from the tip of the ear in the opposite direction.

We tighten the wire - we get an ear.

On the same end of the wire we collect 11 yellow beads, after which, holding the last bead, we pass the same end of the wire through the bead closest to it in the opposite direction.

We tighten the wire - we get the tip of the second ear of the giraffe.

We string 3 more yellow beads onto the same end of the wire, and then pass the same end of the wire through the 6th bead from the tip of the ear in the opposite direction.

We tighten the wire - the second ear is ready.
We collect 1 more yellow bead on the same end of the wire, after which we pass the other end of the main wire in the opposite direction through 7 yellow beads.

We tighten the wire.


Side view:

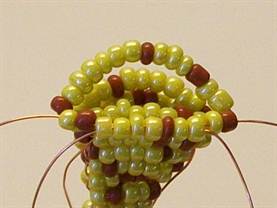
7 row
Upper tier: string 3 yellow beads onto the wire, then 2 brown beads.
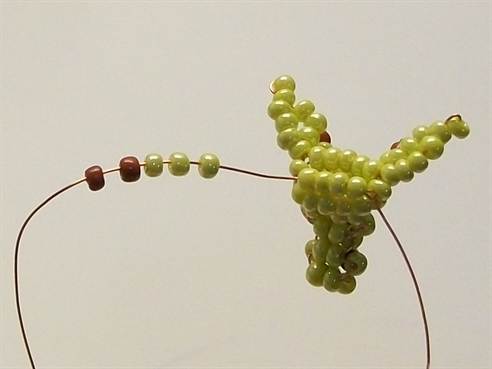
We hold the last brown bead and pass the same end of the wire through the penultimate brown bead in the opposite direction.

We tighten the wire.

We collect 3 more yellow beads on the same end of the wire.

Then we pass the other end of the main wire in the opposite direction through 6 yellow beads. We got the beginning of a giraffe's mane.

Bottom tier - 1 brown, 1 yellow, 1 brown, 1 yellow beads.

8 row
The top tier is woven in the same way as the top tier of the 7th row, with a decrease in the number of yellow beads.
First we string 2 yellow beads, then 2 brown beads; holding the last brown bead, we pass the same end of the wire through the penultimate brown bead in the opposite direction, collect 2 more yellow beads, after which we pass the other end of the main wire in the opposite direction through 4 yellow beads.

Bottom tier - 4 yellow beads.
9 row
We weave the top tier in exactly the same way as the tier of the 8th row.
Bottom tier - 1 yellow, 2 brown, 1 yellow.
10 row
We weave the top tier in the same way as the tier of rows 8 and 9. Bottom tier - 4 yellow beads.

11 row
We weave the upper tier like the previous one, changing the color of the beads: first we collect 1 brown, 1 yellow and 2 brown beads; holding the last brown bead, we pass the same end of the wire through the penultimate brown bead in the opposite direction, pick up 1 more yellow and 1 brown bead, after which we pass the other end of the main wire in the opposite direction through 4 beads (without touching the mane).

Bottom tier - 1 brown, 1 yellow, 1 brown, 1 yellow.
12 row
Both tiers are woven exactly the same as tiers 8 and 10 rows.

13 row
We weave both tiers by analogy with the 9th row.

14 row
Both tiers correspond to tiers 8, 10 and 12 rows.
15 row
It is woven similarly to several previous ones, but the colors change.
Upper tier: 1 yellow, 3 brown beads; holding the last brown bead, we pass the same end of the wire through the penultimate brown bead in the opposite direction, pick up 1 more brown and 1 yellow bead, after which we pass the other end of the main wire in the opposite direction through 4 beads (excluding the mane).

Lower tier: 1 yellow, 1 brown, 2 yellow, 1 brown.

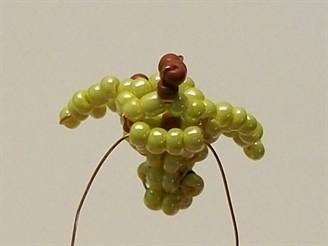
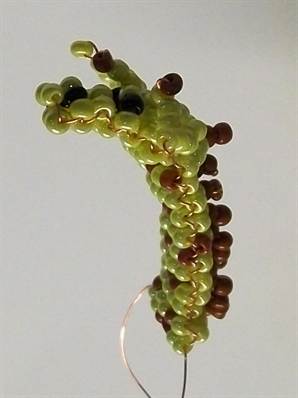
16 row
The top tier is identical to the top tier of the 7th row. Bottom tier: 2 yellow, 2 brown, 2 yellow.
The weaving of the head and neck is completed. View at the current stage:
17 row
Top tier: 1 brown, 3 yellow, 1 brown, 3 yellow. Lower tier: 1 yellow, 1 brown, 4 yellow, 1 brown.
18 row
Top tier: 2 yellow, 1 brown, 3 yellow, 1 brown, 2 yellow. Lower tier: 1 brown, 4 yellow, 1 brown, 2 yellow.

Row 19
Top tier: 4 yellow, 2 brown, 4 yellow.

Lower tier: 1 brown, 4 yellow, 1 brown, 1 yellow, 1 brown, 1 yellow. Next, take an additional piece of wire and pass it through 7 medium beads (leaving 1 bead on both sides). In the future, this wire will be used to weave the front legs of the giraffe.
We tighten the wire.
20 row
Top tier: 3 yellow, 1 brown, 6 yellow, 1 brown. Lower tier: 7 yellow, 1 brown, 2 yellow.
21 row
Top tier: 1 brown, 6 yellow, 1 brown, 3 yellow, 1 brown, 2 yellow.

Lower tier: 1 yellow, 1 brown, 4 yellow, 1 brown, 3 yellow, 1 brown. Take an additional piece of wire and pass it through 7 medium beads (leaving 2 beads on both sides). This wire is needed to weave the front legs of a giraffe.

We tighten the wire.
22 row
Top tier: 2 yellow, 1 brown, 5 yellow, 1 brown, 4 yellow, 1 brown. Lower tier: 1 yellow, 1 brown, 1 yellow, 2 brown, 6 yellow.

23 row
Top tier: 3 yellow, 1 brown, 3 yellow, 2 brown, 2 yellow, 1 brown, 1 yellow. Lower tier: 4 yellow, 1 brown, 3 yellow, 2 brown.

24 row
Top tier: 6 yellow, 1 brown, 5 yellow.

Lower tier: 1 brown, 9 yellow. We take the last additional piece of wire and pass it through 8 medium beads (there remains 1 bead on both sides). This wire will go to the giraffe's hind legs.
Beading is a real art, and some of the products can easily be called masterpieces. Making beautiful things from beads is easy, you just need to master the basic techniques. However, beginners must not only have patience, but also show perseverance. Any person who decides to learn how to weave with beads will not be disappointed in the end.
First you need to familiarize yourself with the basic weaving techniques and choose the most convenient one. In addition, you should find large beads that will be easier to work with. Beginners should not immediately take on voluminous things, as they require not only a significant investment of time, but also certain skills. In many ways, the type of finished product depends on the quality of the material used. If, while working on beads, inclusions of foreign particles or unevenness on the wire were found, such material must be replaced.
To weave quality beads, beginners need to pay attention to several recommendations:

Mosaic technique
For many beginning needlewomen, this technique turns out to be the simplest. However, even experienced craftsmen can make mistakes, and that's normal. To avoid mistakes, you need to carefully study the diagram of a circle made of beads or other products. In accordance with this technique, the beads are arranged in a checkerboard pattern, thereby forming a canvas. You should talk about the principles of mosaic weaving:
- The work is carried out on one thread.
- The number of beads is always a multiple of two.
- If it is necessary to create a fabric from an odd number of beads, then additional passes with a needle must be made through the outer ones.

You should start working on an even-numbered fabric by collecting the required number of beads; as a result, they will make up the first level. Then one bead is cast on, and the thread is passed through the second one from the end of the row. After this, the next level of beads is collected, which is stitched through the fourth level from the end. This process is repeated until all the beads required for the row have been collected.
To complete the level, the thread must pass through the first bead. To set each subsequent row, you need to sew new beads through the last one of the previous level. Before breaking the thread, you need to pass it in a zigzag through the entire fabric.
Brick beading
This type of weaving is somewhat reminiscent of mosaic, but the technique of its implementation has significant differences - it requires more time, and the work is carried out in the opposite direction. Since these two techniques are similar, they can be used to create one product, and the connections will be invisible.
The principle of the brick technique is as follows:

The second row can be expanded - two beads are put on the needle, and the stitch is passed through a thread that unites 2 elements of the first level. You need to bring the thread through the second bead of the new row. The next two are dealt with in the same way. When introducing the sixth bead into a row, the needle should be inserted through the previous one, and exit through the fourth bead of the first two levels.
Starting from the fifth row, the canvas must begin to narrow. To solve the problem, two beads are strung together. In this case, the stitch should pass under the thread connecting the sixth and seventh beads of the fourth row. The needle is returned through the second beads of the new row. After this, the stitch is directed along the weaving path, through the first and second beads of the fifth row.
French way
 This technique is very popular: it is best to weave a giraffe from beads or another figurine using it. All products made in accordance with the circular technique look airy and openwork. When using it, the basis of any element of the product is a thick central wire, onto the base of which several beads are placed.
A thinner wire with beads is attached to this structure from the bottom. It is important to remember that both rods are parallel to each other and are connected using one curl. The result is half an arc. On the second side of the central rod there is another wire with beads attached to it from below. If you make several more similar arcs, you will get a leaf.
Please note that the last wire is attached with 2 turns, and its end must be cut off. You also have to cut off the end of the central rod, leaving a margin of 0.5 cm. After this, it is bent into the inside of the product.
Parallel option
It is often chosen by beginning needlewomen, since the use of parallel weaving makes it easy to create three-dimensional products. For example, in this way you can weave an apple from beads. The principle of the technique is as follows:

As a result, the levels are parallel, and the ends of the fishing line or wire come out from each side of the product.
To weave a dachshund or other three-dimensional figure from beads, the rows must be laid one under the other. If the canvas does not require volume, then the levels should simply be placed in the same plane.


